Why gradients band, and four ways to fix it
Those faint stripes across a large gradient are not a rendering bug. They are 8-bit colour running out of steps, and there are several ways around it.

You ship a large hero with a subtle gradient, and on some screens it shows faint horizontal stripes. Nothing is broken. You have simply asked for more precision than 8 bits per channel can give.
The arithmetic
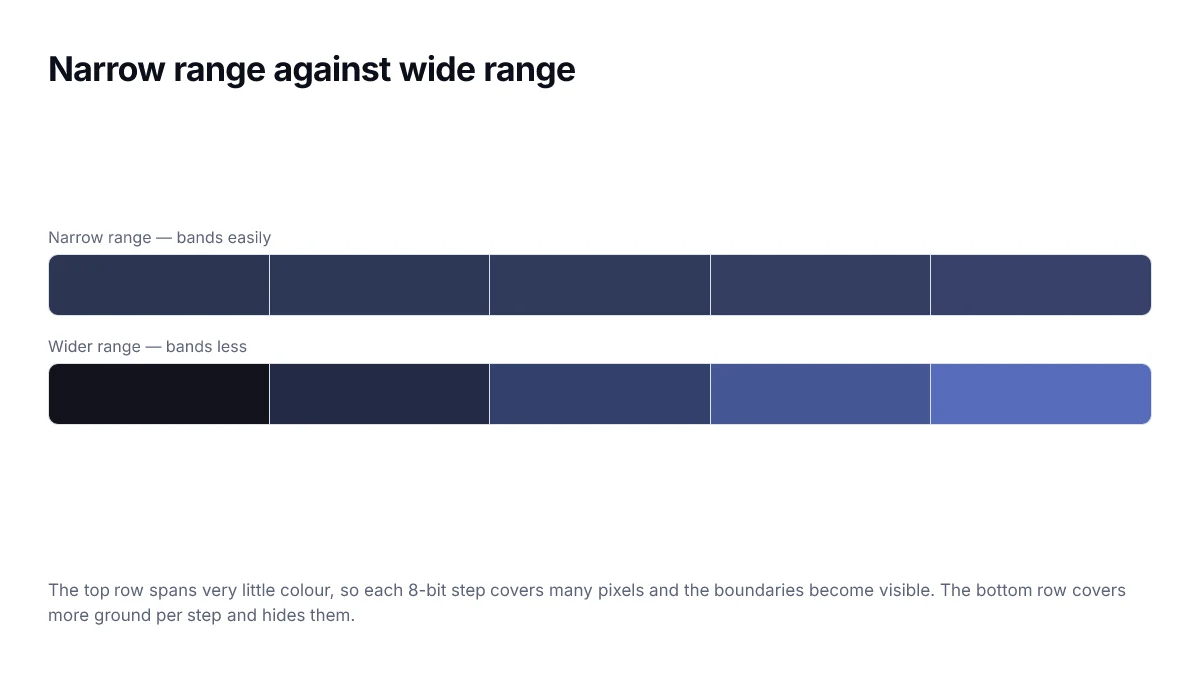
Each channel has 256 possible values. If a gradient moves from one colour to another that differs by, say, 12 steps in each channel, and you stretch that across 1200 pixels, each step covers 100 pixels. A 100-pixel-wide flat band with a hard edge is exactly what the eye is good at spotting.
This is why banding gets worse as the gradient gets subtler. A dramatic gradient has hundreds of steps to work with; a barely-there one might have twenty.
Fix 1: widen the range
The simplest fix, and often acceptable. Push the endpoints further apart so there are more distinct values to distribute. If the design demands subtlety, one of the other fixes is better.
Fix 2: add noise
A very faint noise texture over the gradient dithers the boundaries, which breaks the flat bands into something the eye reads as continuous. This is what image editors do automatically when you ask them to dither a gradient.
.hero {
  position: relative;
  background: linear-gradient(160deg, #12141C, #34406C);
}

.hero::after {
  content: "";
  position: absolute;
  inset: 0;
  pointer-events: none;
  opacity: 0.035;
  background-image: url("data:image/svg+xml,%3Csvg xmlns='http://www.w3.org/2000/svg'%3E%3Cfilter id='n'%3E%3CfeTurbulence type='fractalNoise' baseFrequency='0.8'/%3E%3C/filter%3E%3Crect width='100%25' height='100%25' filter='url(%23n)'/%3E%3C/svg%3E");
}
Keep the opacity very low. Above roughly five percent it stops being invisible dithering and starts being a visible texture.
Fix 3: change the angle
Bands run perpendicular to the gradient direction. A gradient at exactly 0 or 90 degrees produces bands parallel to the screen edges, which is where they are most obvious. Rotating a few degrees makes the boundaries diagonal and considerably harder to see.
Fix 4: add intermediate stops
More stops give the browser more anchors, and it recalculates the interpolation between each pair. This will not add precision beyond 8 bits, but it does redistribute where the steps fall, which frequently breaks up a visible band.
What not to do
Do not export the gradient as a JPEG to fix it. JPEG compression handles smooth gradients badly and often makes banding worse, while costing you a network request and the ability to theme the colour.
Combining the fixes
In practice the techniques stack, and a stubborn gradient usually needs two of them. A sensible order is to try the cheapest first and stop as soon as the stripes disappear.
| Fix | Cost | When it is the right one |
|---|---|---|
| Widen the colour range | Free | The design can tolerate more contrast |
| Rotate a few degrees | Free | Bands run parallel to a screen edge |
| Add intermediate stops | Free | Banding is concentrated in one region |
| Overlay faint noise | One small inline SVG | The gradient must stay subtle |
| Reduce the painted area | Layout change | The gradient is larger than it needs to be |
Testing for it deliberately
Banding is easy to miss on the machine you built the page on. Turn the screen brightness up, view the page in a dark room, and look at the gradient from slightly off-axis — all three make the boundaries more visible. If it survives that, it will survive your users' displays.
Banding in images versus banding in CSS
The two look identical on screen and have different fixes, so it is worth telling them apart before spending time on the wrong one. Zoom the browser in: a CSS gradient recalculates and its bands move or change width, while an image is resampled and its bands stay locked to the picture.
| CSS gradient | Image | |
|---|---|---|
| Bands on zoom | Shift and rescale | Stay fixed to the content |
| Fix | Angle, stops, noise overlay | Re-export with dithering |
| Themeable | Yes, via custom properties | No |
| Network cost | None | One request |
Why noise works
Adding noise seems like it should make things worse — you are deliberately introducing error. It works because the eye is far better at detecting a coherent edge than at detecting random variation. Scattering pixels either side of the boundary means no continuous line survives for the visual system to lock onto, and the transition reads as smooth even though it is technically noisier.
This is the same principle as dithering in image formats, and it is why image editors offer a dither option when saving a gradient to a format with limited colours. The CSS version is doing by hand what those exporters do automatically.
Frequently asked questions
- Is banding a browser bug?
- No. It is the arithmetic of 8-bit colour. A gradient spanning a small colour range across a large area has few distinct values to distribute, so each one covers many pixels and the boundaries become visible as stripes.
- Why does banding appear on some screens and not others?
- Panel bit depth and any dithering the display or GPU applies both make a difference, as does brightness. A gradient that looks smooth on a laptop can band visibly on an external monitor, which is why testing on more than one screen is worth the effort.
- Will exporting the gradient as an image fix it?
- Usually it makes things worse. JPEG compression handles smooth gradients poorly and can introduce blocking on top of the banding, and you lose the ability to theme the colour while adding a network request.
- Does interpolating in OKLCH remove banding?
- It changes where the steps fall, which sometimes helps, but it does not add precision. The underlying limit is still 8 bits per channel. Treat it as one more redistribution technique alongside changing the angle and adding stops.
- How much noise is too much?
- Above roughly five percent opacity the noise stops working as invisible dithering and starts reading as a deliberate texture. If you can see grain when you are not looking for it, reduce the opacity rather than the frequency.
Sources
- CSS Images Module Level 3 — gradients — W3C
- linear-gradient() — MDN Web Docs